Deluxe KeyForge Deck Boxes
Cait and I play a fair bit of KeyForge together, and even go to small local KeyForge nights when we can get childcare. But since we were going to the Albany Vault Tour, we needed something we’d never had before: separate boxes for our components.
So I made a pair of these:
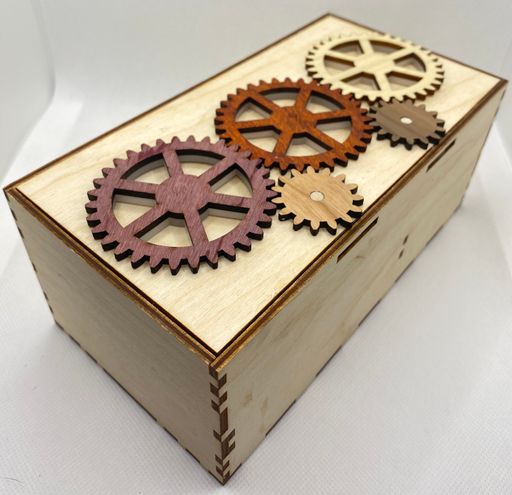
Inside is space for three sleeved decks (it was a survival tournament, after all), a small component tray, and a storage area for our aember tokens and spare card sleeves.
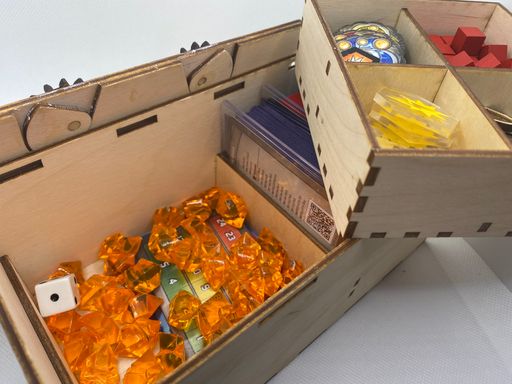
The best part, though, is the three gears on the lid. Not only do they come off so you can use them as key tokens in the game, they’re the keys to opening the box itself.
To unlock the box, you need to remove the center gear and then turn the outer gears.
Magnet Prototype
The boxes we ended up with aren’t the ones I started building. The gears themselves were a late addition. But we started knowing that we wanted the keys on the lid, held on with magnets. Would the neodymium magnets attract well enough through the wood? I made a prototype to find out:
This ended up working great, with the magnets being completely hidden by the wood but still having a good enough attraction to stay in place. I was able to use the same image for the key and its hole, since the kerf was just right for an easy fit.
Lid Design #1
I had a few goals for the lid:
- It should be rugged enough to be carried in a bag, so there shouldn’t be any parts sticking up or out that might snag or get snapped off.
- It needed to be held shut by a lock or latch so it could be carried in any orientation without spilling.
- Ideally it wouldn’t need any additional hardware (like hinges) that I would have to learn how to incorporate.
I especially didn’t want the lid to put direct force on any glued surfaces. I have a laser cut “bit box” that has thin strips that make a track for a sliding lid, and they keep breaking off.
My first design was a simple sliding lid. It fit through a slot on the short side of the box. I was excited to be able to use the keys as a lock: if they were in place, it couldn’t fit through the slot and therefore stayed closed.
I whipped up a quick prototype in Fusion 360, using the key from the magnet test as the stopper.
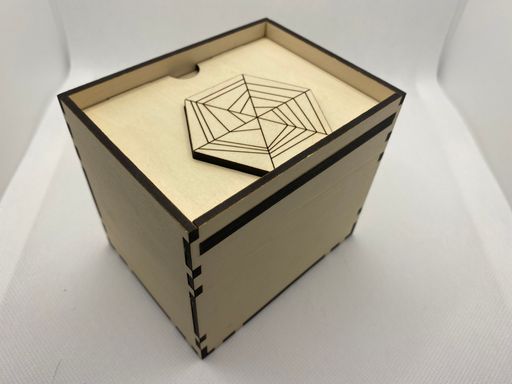
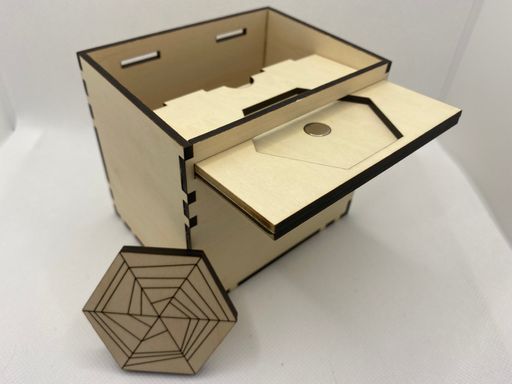
This fit the design criteria, but I wasn’t satisfied.
- I needed enough material above the slot to keep it from being too fragile. That added a lip around the top of the entire box that was mostly unnecessary and took away prominence from the keys.
- For a key to act as a stopper, it needed to be nearly flush to the edge of the lid. That would leave a lot of unbalanced space between the keys.
- The sliding action was kind of awkward, as you can see in the video below. It might have improved once there was a tray in place, but this wasn’t a promising start.
Testing using the key as a stopper for a sliding lid.
Lid Design #2
My next bit of inspiration came when I was starting to think about what the non-prototype keys would look like. I could stick with hexagons, since you can’t go wrong with KeyForge and the number 6. I also had a vector version of the official key design that I could adapt to wood.
It was then that I realized that my design was missing my signature artistic element: gears.
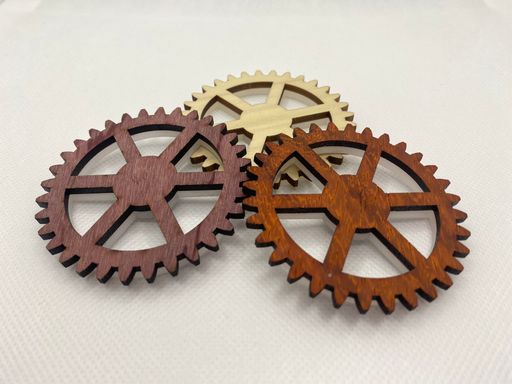
Gears!
Gears are visually interesting and would make great key tokens for the game. While they could work as stoppers in the existing lid design, could they be part of a mechanism that would actually operate the box’s lock? The magnetic attraction would provide something of an axle for the gear to rotate around…
I thought about ways to have hidden or recessed gears, making the keys necessary to operate the lock, but when doing wooden mechanisms — especially on a deadline — simpler is better. In the final design, the key gears mesh with the smaller gears that then rotate a latch into a slot on the box. You don’t actually need the key gears to lock and unlock it. You can just rotate the smaller gears by hand.
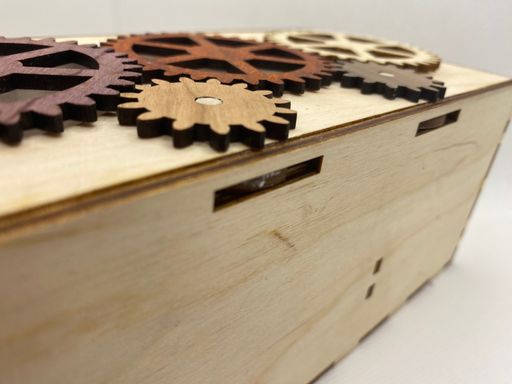
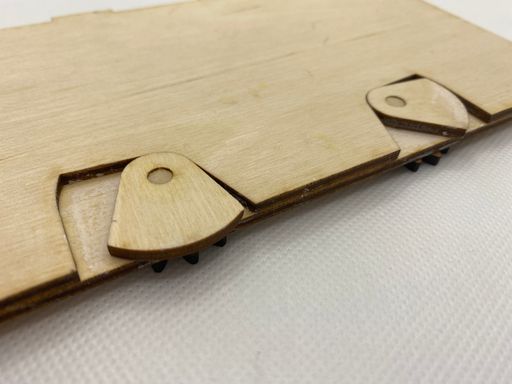
Underside of the lid showing the two latches that rotate to lock it. The latches are affixed to the same axel as the small gears on the other side.
I still wanted the key gears to have some role in the lock mechanism, so what they ended up doing was keeping it from moving. Three gears meshed together won’t move individually, so if all the keys are in place, the box would stay locked.
I made a full-size prototype using MDF just to make sure it worked in practice and that all the necessary bits would fit in the tray and compartment. They did! This helped me realized that the teeth on the gears were small and kind of ugly, though, so I halved the number of them from 64 to 32 in the final versions while keeping the same overall size.
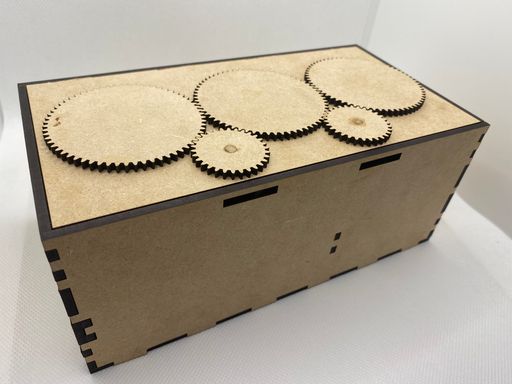
Prototype version done in MDF. The mechanisms work, but the gears are purely functional.
Design Tools
The bulk of the design work was done in Fusion 360. Making boxes is kind of annoying, since you model each side of the box as a separate body and you have to do the finger joints by hand, but you can get some mileage out of rectangular patterns and mirroring. And once you’ve put them on one face, you can subtract that body from the ones it intersects to make the matching slots. I have my kerf settings dialed in so that this gives a nice snug fit.
Fusion 360 really shines when you start constraining parts of the design to other parts, so that when you make a change to a length or a height then the other parts of the design adjust to match.
That is, at least, what I tell myself. I’m not sure if this is very time saving because if you don’t make perfect choices with what depends on what, you can end up needing to do a fair amount of cleanup when only one half of a design updates correctly.
For gears, though, I switch to Inkscape and the gears-dev extension. These make the best-looking and easiest-to-customize gears out of any program I’ve used. All I needed to do to use these gears with the Fusion 360 model was to design around the “pitch circle” of the gears. If you place the axel holes so that the pitch circles of two gears touch, the gears themselves will mesh correctly.
I’ve found that you don’t need to compensate for kerf when cutting out gears. In fact, it’s better that you don’t. Taking 0.1mm off of each gear gives them a little bit of slack that helps them run smoothly.
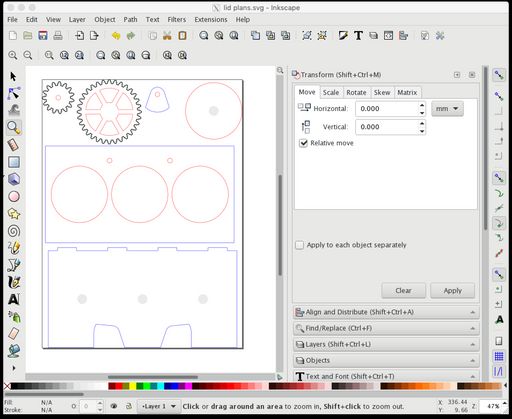
The final SVG for the lid from Inkscape.
Materials
I didn’t have enough of any Proofgrade, which is what I would usually use for this kind of project, but I didn’t realize that until it was too late to get more.
Some tips on the Glowforge forums led me to Woodpeckers’ baltic birch plywood, which was conveniently available through Amazon Prime. The pieces were a bit more warped than I would have liked. My understanding is that it’s kind of a crapshoot in that regard: some are better than what I received, some are worse.
They were cheap, though, and came reliably quickly. I did my own masking with a roll of vinal transfer tape.
The keys needed to be red, yellow, and blue. I was considering doing translucent acrylic inlays until some padauk hardwood came from Inventables. It was such a striking red that I knew I could do the gears just in hardwood and make them appealing and distinctive colors.
For yellow I used a Glowforge poplar hardwood, which was different enough from the baltic birch to contrast. Blue is purpleheart and red, as mentioned, is padauk. I got both of these last two from Inventables.
The underside of the keys is a 40% transmission translucent acrylic. While I don’t love the look of mixing plastic and wood, I needed a side that was obviously “unforged,” and none of the other woods I had on hand were different enough from the yellow key’s poplar to make that clear.
Assembly and Finishing
I gave all of the baltic birch pieces a smoothing with 400 grit sandpaper. I’ve tuned my kerf settings so that the finger joints are tight enough to need a rubber mallet for assembly and they don’t come apart easily, but since these were going to be carted around and jostled I reinforced it all with wood glue.
The magnets are glued in with Gorilla CA glue.
To try and keep the locks sliding easily I rubbed the facing surfaces with some crayon, which is a trick I learned for lubricating wooden mechanisms.
The baltic birch is unfinished. I may try to stain or coat it later, but more as an opportunity to get better at finishing wood than something I feel that the design needs.
Conclusion
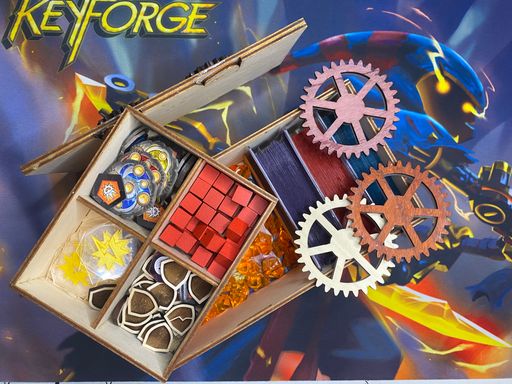
What do you think? They worked well at the tournament, even when my decks inside them did not. I’d love to make the mechanism more complicated, if I can do so reliably.
Are there any parts of designing for laser cutting you’d like more explanations or a tutorial about? Let me know on Twitter.